はじめに
この記事の概要
こんにちは、株式会社TOKOSのスギタです!
今回はGreenSock社のGreenSock Animation Platform(GSAP)を使い、前回記事で作成したテキストアニメーションを元に各種イージングの比較をしていきたいと思います。今回のベースとなるテキストアニメーションの実装方法を見たい方は下記を参照してください。
対象読者
- web制作でアニメーションの実装をしたい方
GSAPのイージングの概要
GSAPのイージングの指定はeaseプロパティを使用します。
gsap.to("#text", { ease : power1.easeOut});イージングの種類も豊富に存在します。(15種類)
- Power0
- Power1
- Power2
- Power3
- Power4
- Back
- Elastic
- Bounce
- Rough
- SlowMo
- Stepped
- Circ
- Expo
- Sine
- Custom
Customは自作イージングになります。
イージングとは別に加速・減速の指定も可能です。
3種類存在します。
- easeIn : 最初が最低速で、加速する
- easeOut : 最初が最高速で、減速する
- easeInOut : はじめはゆっくりで加速し、最後は減速する
またイージング名BackとElasticはイージングの強度も指定可能です。()で囲み指定することが可能です。
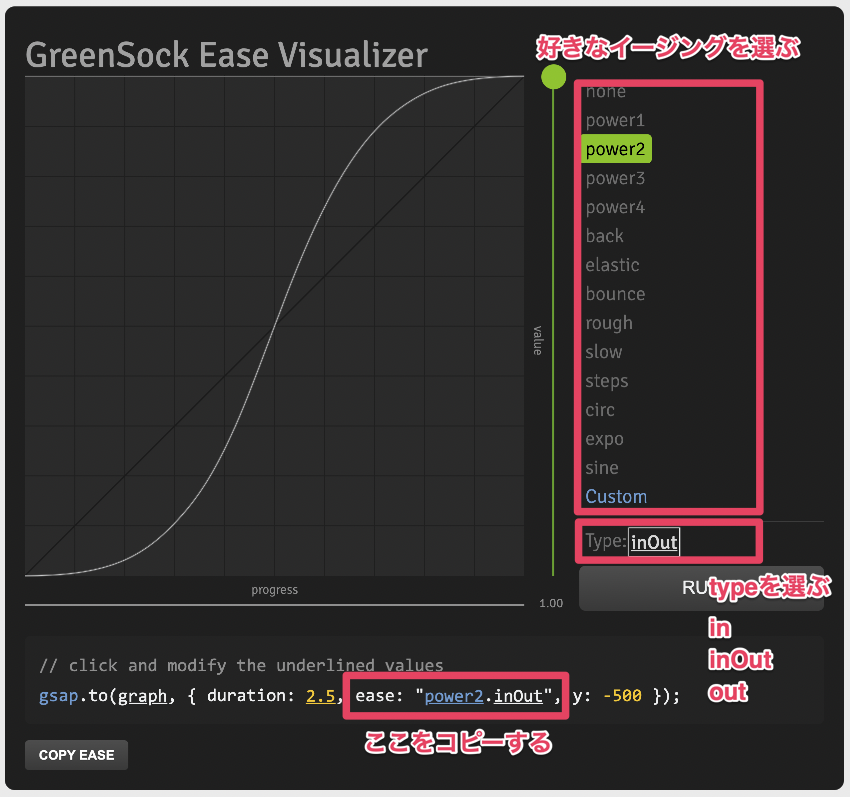
gsap.to("#text", { ease: Elastic.easeOut.config(1, 0.3)});イージングの選択は公式からすることが出来ます。
下記画像の様に自分で選び選択することが出来ます。

テキストアニメショーンイージング比較用のコードの紹介
今回使用するテキストアニメーションは前回記事で紹介したテキストアニメーションを使用します。
前回記事は下記になります。
HTML
<header>
  <div class="ease-name">
    <span>easeIn</span>
    <h1  id="ease-in">PLAY TO ENJOY</h1>
  </div>
  <div class="ease-name">
    <span>easeInOut</span>
    <h1 id="ease-in-out">PLAY TO ENJOY</h1>
  </div>
  <div class="ease-name">
    <span>easeOut</span>
    <h1 id="ease-out">PLAY TO ENJOY</h1>
  </div>
</header>
CSS
header {
  /*下記はレイアウトを整えるものです*/
  display: grid;
  place-content: center;
  height: 100vh;
  background-color: #333;
}

h1 {
  color: #fff; /*お好きなフォントカラーを選んでください*/
  font-size: 20px; /*お好きなフォントサイズを選んでください*/
  font-family: "Times New Roman", Times, serif; /*お好きなフォントを選んでください*/
  clip-path: polygon(0 0, 100% 0, 100% 100%, 0% 100%);
  line-height: 1; /*line-heightなくしたほうがカッコ良くなります*/
}

.char {
  transform: translateY(100px);
  transition: transfrom 0.5s;
  /* transform: translateY(-100px); テキストを上から出したい時*/
}

#ease-in,
#ease-in-out {
  margin-bottom: 20px;
}

div span {
  color: #fff;
  font-size: 16px;
}
加減速の三種類とイージングの種類で比較していこうと思っているので、比較用に3つ用意しました。
JavaScript
const easeIn = new SplitType("#ease-in"); /*テキストの分割*/
const easeInChar = document.querySelectorAll("#ease-in .char"); /*#ease-inの.charの取得*/
const easeInOut = new SplitType("#ease-in-out"); /*テキストの分割*/
const easeInOutChar = document.querySelectorAll("#ease-in-out .char"); /*#ease-in-outの.charの取得*/
const easeOut = new SplitType("#ease-out"); /*テキストの分割*/
const easeOutChar = document.querySelectorAll("#ease-out .char"); /*#ease-outの.charの取得*/

gsap.to(easeInChar, {
  y: 0 /*テキストのY軸の操作*/,
  stagger: 0.05 /*テキスト間の遅延時間*/,
  delay: 0.2 /*アニメーションのスタートまでの遅延時間*/,
  duration: 1 /*アニメーションの時間*/,
});

gsap.to(easeInOutChar, {
  y: 0 /*テキストのY軸の操作*/,
  stagger: 0.05 /*テキスト間の遅延時間*/,
  delay: 0.2 /*アニメーションのスタートまでの遅延時間*/,
  duration: 1 /*アニメーションの時間*/,
});

gsap.to(easeOutChar, {
  y: 0 /*テキストのY軸の操作*/,
  stagger: 0.05 /*テキスト間の遅延時間*/,
  delay: 0.2 /*アニメーションのスタートまでの遅延時間*/,
  duration: 1 /*アニメーションの時間*/,
});
今回はsplitTypeを用いてテキストの分割を行っています。分割した際に個別に別のプロパティを与えたいのでquerySelectorAllで個別に分割した際に生成されるclass=”char”を取得しております。
下記の様に取得可能です。
const char = document.querySelectorAll("#hoge .char"); /*#hogeの.charの取得*/またその親クラスのclass=”word”も取得可能です。
const word = document.querySelectorAll("#hoge .word"); /*#hogeの.wordの取得*/行いたいアニメーションによって使い分けましょう!
ここからeaseプロパティを追加して各種見ていきたいと思います。
GSAP各種イージング比較
ここから各種類比較していきたいと思います。
指定なし
何も指定していない状態です。
See the Pen Untitled by tks-sugita (@tks-sugita) on CodePen.
Power0
Power0は加減速の指定は出来ません。
See the Pen Untitled by tks-sugita (@tks-sugita) on CodePen.
Power1
See the Pen Untitled by tks-sugita (@tks-sugita) on CodePen.
Power2
See the Pen Untitled by tks-sugita (@tks-sugita) on CodePen.
Power3
See the Pen Untitled by tks-sugita (@tks-sugita) on CodePen.
Power4
See the Pen Untitled by tks-sugita (@tks-sugita) on CodePen.
Back
See the Pen Untitled by tks-sugita (@tks-sugita) on CodePen.
Elastic
See the Pen Untitled by tks-sugita (@tks-sugita) on CodePen.
Bounce
See the Pen Untitled by tks-sugita (@tks-sugita) on CodePen.
Rough
Roughは少し特殊でギザギザの効果を得ることが出来ます。オプションが6種類あり選ぶことが出来ます。詳しくは公式を参照してください。
See the Pen Untitled by tks-sugita (@tks-sugita) on CodePen.
SlowMo
InとOutの移行をスムーズにしたものです。第一引数に、変化の割合、第二引数にイージングの強さ、第三引数にyoyoの有無になります。詳しくは公式を参照してください。
See the Pen Untitled by tks-sugita (@tks-sugita) on CodePen.
Stepped
通常じゃ開始値と終了値の間で滑らかで段階的な移行を行いますが、SteppedEase は、移行にステップ数を定義することが可能になります。
See the Pen Untitled by tks-sugita (@tks-sugita) on CodePen.
Circ
See the Pen Untitled by tks-sugita (@tks-sugita) on CodePen.
Expo
See the Pen Untitled by tks-sugita (@tks-sugita) on CodePen.
Sine
See the Pen Untitled by tks-sugita (@tks-sugita) on CodePen.
自作(Custom)
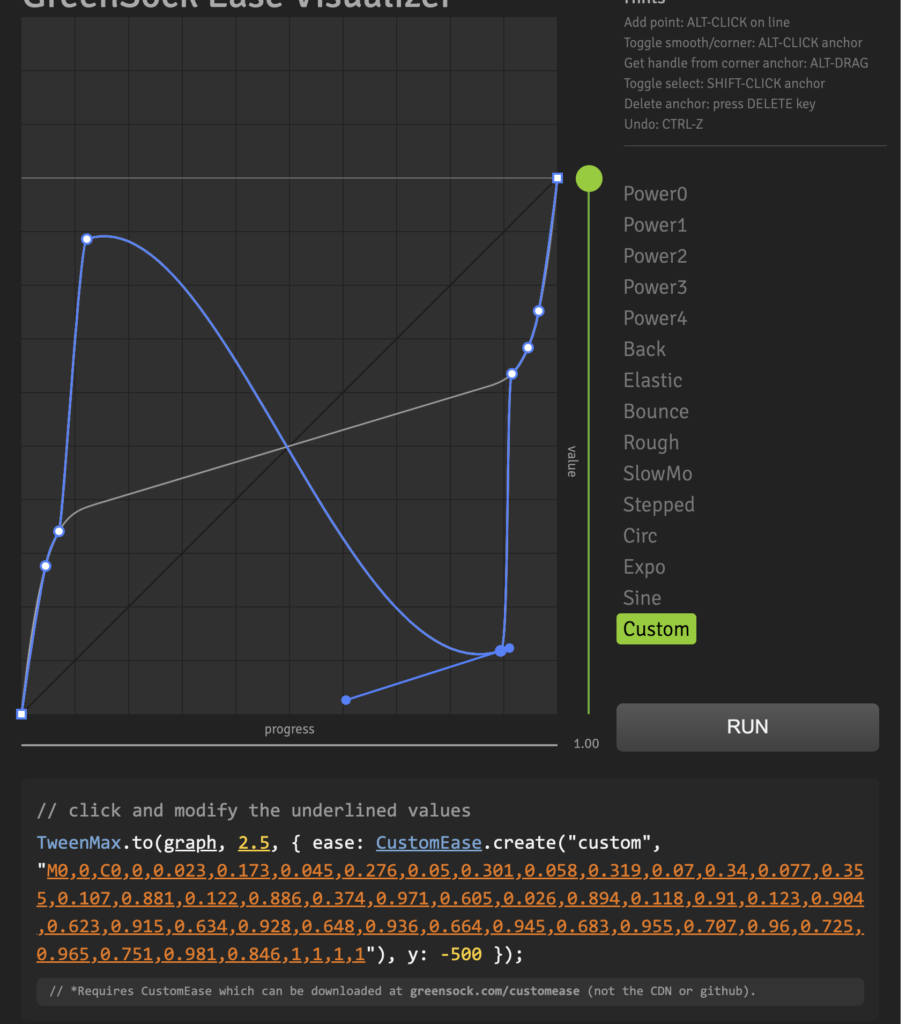
公式ドキュメントより自作することが可能です。下記のようにグラフィカルに作成することが出来ます。

See the Pen Untitled by tks-sugita (@tks-sugita) on CodePen.
さいごに
今回は各種イージングを比較できるように全て試してみました。
初めて使うイージングもありこんな事もできるのかとためになりました。
種類が多くかなり表現の自由ができるな感じました。
個人的にはPower1~4が無難で使いやすいなと感じました。
皆さんも一度色々試して見てほしいです!
 ISSEN
ISSEN 


