
はじめに
この記事の概要
こんにちは、株式会社TOKOSのスギタです!
今回はWordPressでサムネイル付きの動的カルーセルを作ってみたいと思います。
またオリジナルのページネーションの作り方などの細かい箇所も合わせて作って行きたいと思います。
対象読者
- WEB制作を行っている方
今回の完成予定
今回はWordPressの投稿機能とSwiper.jsを用いて動的なカルーセルを作ってみたいと思います。
開発環境
- WordPress 6.4.2
- Advanced Custom Fields 6.2.4
- Swiper v11
今回はCDNで実装していきます。

実装
実装の前に
今回はSwiperの基本的な使い方は省略します。
もし基本的な使い方がわからない方は下記を参照してください。
またWordPressの投稿の入力欄拡張としてACF(Advanced Custom Fields)を使っていきます。
基本的な使い方がわからない方は下記を参照してください。

実装の流れ
今回の実装の手順は下記とします
- ACFで作成したフィールドを呼び込んで動的化
- Swiperを用いてカルーセルの実装
- ページネーションとタイトルと日付の追加
このような手順で進めていきたいと思います!
ACFでフォームの追加
ACFで投稿機能に対してフォームの追加をしていきます。
追加していくフォームは下記になります。
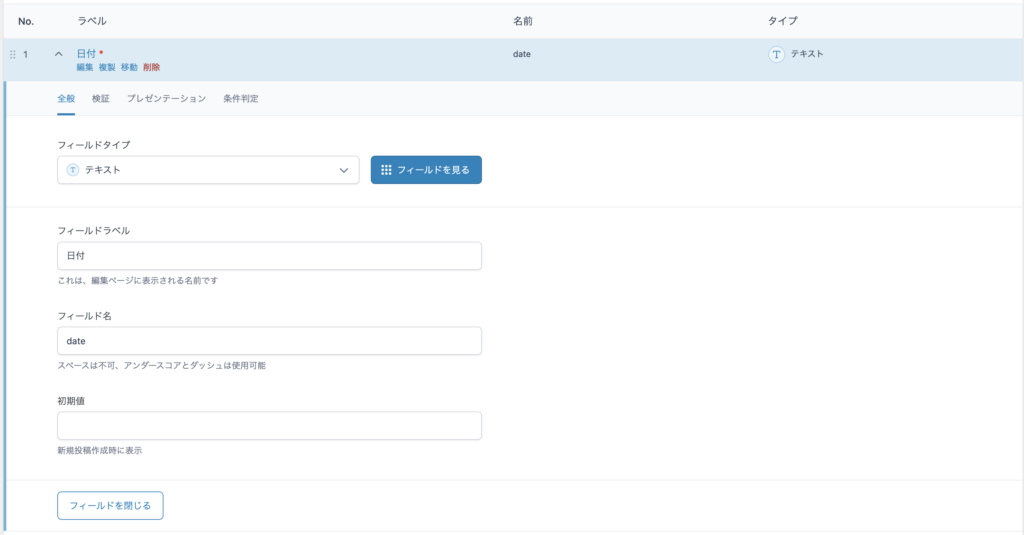
- 日付
- タイトル
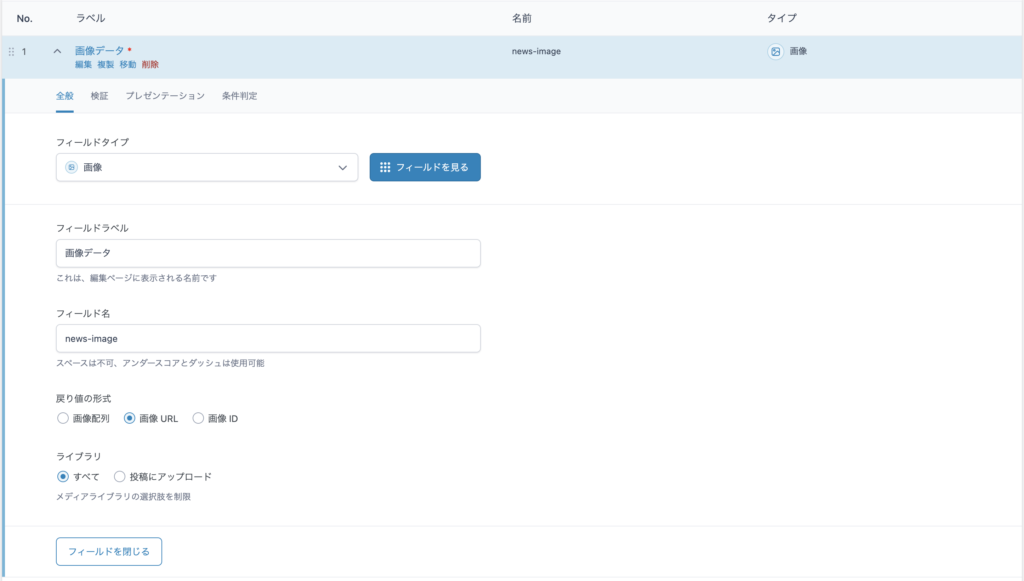
- 画像データ
日付の設定は下記になります。
タイトルの設定は下記になります。
画像の設定は下記になります。
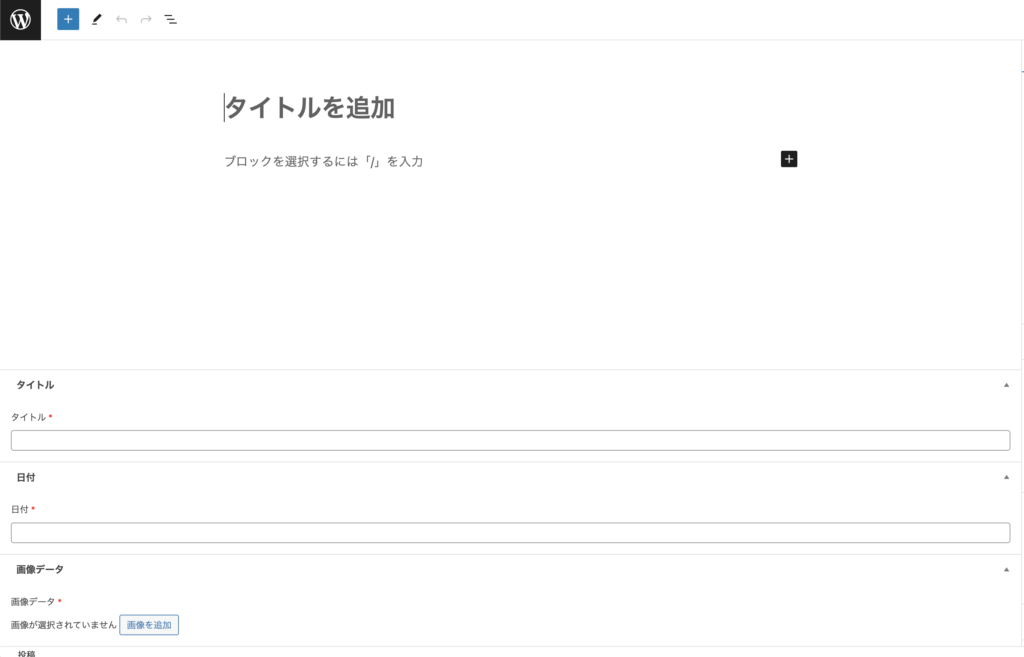
これでフォームの追加設定は完了しました。
下記は設定後の投稿画面です。
ここからHTMLとCSSを記述していきます。
HTMLとCSS
HTMLとCSSの記述とWhile文で繰り返し処理しています。
<div class="c-gallery">
  <div class="c-gallery__content">
    <div class="c-gallery__left-section">
      <div class="c-gallery__parent">
        <div class="swiper parentSwiper">
          <!-- カルーセルのプレビュー側 -->
          <div class="swiper-wrapper">
            <!-- 投稿画像の繰り返し処理 -->
            <?php while ( have_posts() ) : the_post(); ?>
              <div class="swiper-slide">
                <div class="c-gallery__list">
                  <img src="<?php echo get_field("news-image"); ?>" alt="テスト画像" class="c-gallery__list-img">
                </div>
                <div class="c-gallery__text-area">
                  <div class="c-gallery__date"><?php echo get_field("date"); ?></div>
                  <div class="c-gallery__title"><?php echo get_field("title"); ?></div>
                </div>
              </div>
            <?php endwhile; ?>
          </div>
        </div>
      </div>
    </div>
    <!-- サムネのカルーセル -->
    <div class="c-gallery__thm">
      <div class="swiper childSwiper">
        <div class="swiper-wrapper">
          <!-- 投稿画像の繰り返し処理 -->
          <?php while ( have_posts() ) : the_post(); ?>
            <div class="swiper-slide --child">
              <div class="c-gallery__child">
                <img src="<?php echo get_field("news-image"); ?>" alt="サムネ画像" class="c-gallery__child-img">
              </div>
            </div>
          <?php endwhile; ?>
        </div>
      </div>
    </div>
  </div>
</div>
css
.c-gallery {
  padding: 80px 16px 100px 16px;
  background-color: #333;
}

.c-gallery__content {
  display: flex;
  max-width: 1120px;
  justify-content: space-evenly;
  width: 100%;
  margin-top: 68px;
  margin: 68px auto 0;
  flex-wrap: wrap;
}

.c-gallery__left-section {
  display: flex;
}

.c-gallery__list {
  max-width: 380px;
  min-width: 380px;
  max-height: 220px;
  min-height: 220px;
  opacity: 1 !important;
}

.u-opacity {
  opacity: 1 !important;
}

.c-gallery__list-img {
  max-width: 380px;
  min-width: 380px;
  max-height: 220px;
  min-height: 220px;
  object-fit: cover;
  opacity: 1 !important;
}

.c-gallery__child {
  max-width: 117px;
  max-height: 100px;
  min-height: 100px;
  max-width: 117px;
}

.c-gallery__child-img {
  object-fit: cover;
  max-width: 117px;
  max-height: 100px;
  min-height: 100px;
  max-width: 117px;
}

.c-gallery__thm {
  width: 100%;
  max-width: 640px;
  position: relative;
  margin-top: 100px;
}

.c-gallery__parent {
  max-width: 380px;
  position: relative;
}

.c-gallery__parent::before {
  content: "";
  max-width: 380px;
  width: 100%;
  height: 220px;
  border: #fff solid 1px;
  position: absolute;
  top: 8px;
  right: -8px;
}

.c-gallery__text {
  top: 10px;
  position: relative;
  color: #fff;
  z-index: 10;
}<div class="c-gallery__text-area">
<div class="c-gallery__date"><?php echo get_field("date"); ?></div>
<div class="c-gallery__title"><?php echo get_field("title"); ?></div>
</div>Swiperの記述
ここからサムネ付きのカルーセルを作成していきます。
早速コードの紹介です。
const mainCarousel = new Swiper(".parentSwiper", {
loop: true,
spaceBetween: 10,
thumbs: {
swiper: subCarousel,
},
autoplay: {
delay: 3500,
disableOnInteraction: false,
},
effect: "fade",
});
const subCarousel = new Swiper(".childSwiper", {
loop: true,
slidesPerView: 5,
freeMode: true,
watchSlidesProgress: true,
spaceBetween: 16,
});今回loopをtrueにして繰り返し表示できるようにしてあります。
個別のパラメーターが知りたい方は下記を参照してください。
カルーセルに関わるスタイリングも追加します。
/* すべてのスライドの基本スタイル */
.swiper-slide.--child {
opacity: 0.5; /* 非アクティブなスライドは薄く表示 */
transition: opacity 0.3s;
}
/* アクティブなスライドのスタイル */
.swiper-slide.--child.swiper-slide-thumb-active {
opacity: 1; /* アクティブなスライドは通常の不透明度 */
}
これで一旦カルーセルは動いていると思います!
ページネーションのカスタム
ここからページネーションのカスタムを行っていきたいと思います。
通常デフォルトのページネーションを使う場合は下記のようになると思います。
const swiper = new Swiper('.swiper', {
pagination: {
el: '.swiper-pagination',
type: 'bullets',
},
});こんな感じで青色で表示されると思います。

これではスタイリングができないのでrenderBulletメソッドでオリジナルのページネーションを生成していきます。
HTML
<div class="c-gallery">
<div class="c-gallery__content">
<div class="c-gallery__left-section">
<div class="c-gallery__parent">
<div class="swiper parentSwiper">
<!-- カルーセルのプレビュー側 -->
<div class="swiper-wrapper">
<!-- 投稿画像の繰り返し処理 -->
<?php while ( have_posts() ) : the_post(); ?>
<div class="swiper-slide">
<div class="c-gallery__list">
<img src="<?php echo get_field("news-image"); ?>" alt="テスト画像" class="c-gallery__list-img">
</div>
<div class="c-gallery__text-area">
  <div class="c-gallery__date"><?php echo get_field("date"); ?></div>
  <div class="c-gallery__title"><?php echo get_field("title"); ?></div>
</div>
</div>
<?php endwhile; ?>
</div>
</div>
</div>
<!-- オリジナルページネーション -->
<div class="c-gallery__index">
<div class="c-gallery__line"></div>
<div id="swiperIndexDisplay"></div>
<div id="customDots"></div>
</div>
</div>
<!-- サムネのカルーセル -->
<div class="c-gallery__thm">
<div class="swiper childSwiper">
<div class="swiper-wrapper">
<!-- 投稿画像の繰り返し処理 -->
<?php while ( have_posts() ) : the_post(); ?>
<div class="swiper-slide --child">
<div class="c-gallery__child">
<img src="<?php echo get_field("news-image"); ?>" alt="サムネ画像" class="c-gallery__child-img">
</div>
</div>
<?php endwhile; ?>
</div>
</div>
</div>
</div>
</div>JavaScript
const mainCarousel = new Swiper(".parentSwiper", {
loop: true,
spaceBetween: 10,
thumbs: {
swiper: subCarousel,
},
autoplay: {
delay: 3500,
disableOnInteraction: false,
},
effect: "fade",
// ページネーションのカスタム
pagination: {
el: "#customDots",
clickable: true,
renderBullet: function (index, className) {
return '<span class="' + className + '"></span>';
},
},
});
const subCarousel = new Swiper(".childSwiper", {
loop: true,
slidesPerView: 5,
freeMode: true,
watchSlidesProgress: true,
spaceBetween: 16,
});これでDevツールで確認してみると、
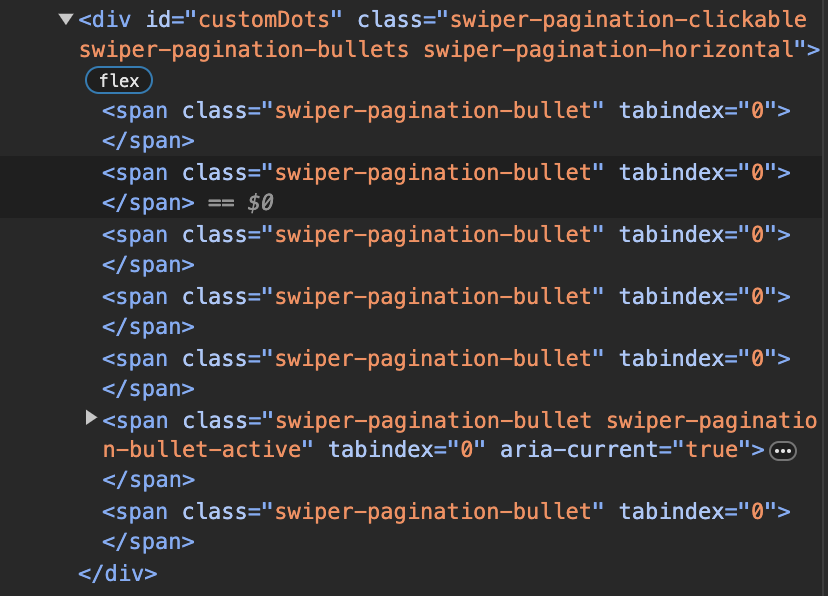
このようにクラス名swiper-pagination-bulletで生成されています。
更にactiveなものにはクラス名swiper-pagination-bullet-activeが付与されています。
ここからスタイリングしていきます。
CSS
// オリジナルdots
.c-gallery__index {
display: flex;
flex-direction: column;
align-items: center;
margin-left: 24px;
}
.c-gallery__line {
width: 1px;
height: 56px;
background-color: #fff;
margin-bottom: 4px;
}
#customDots {
text-align: center;
display: flex;
flex-direction: column;
row-gap: 16px;
max-height: 180px;
flex-wrap: wrap;
}
#customDots .swiper-pagination-bullet {
display: inline-block;
width: 12px;
height: 12px;
background-color: #fff;
border-radius: 50%;
margin: 0 5px;
background-color: rgba($color: #fff, $alpha: 0.6);
}
#customDots .swiper-pagination-bullet-active {
background-color: rgba($color: #fff);
position: relative;
}
#customDots .swiper-pagination-bullet-active::after {
position: absolute;
content: "";
width: 24px;
height: 24px;
background-color: rgba($color: #fff, $alpha: 0.6);
border-radius: 100vh;
top: -50%;
left: -50%;
}次にページネーションに表示しているindex番号です。
onChangeするたびに切り替えたいのでparameterのonを使用します。
const mainCarousel = new Swiper(".parentSwiper", {
loop: true,
spaceBetween: 10,
thumbs: {
swiper: subCarousel,
},
autoplay: {
delay: 3500,
disableOnInteraction: false,
},
effect: "fade",
// ページネーションのカスタム
pagination: {
el: "#customDots",
clickable: true,
renderBullet: function (index, className) {
return '<span class="' + className + '"></span>';
},
},
// インデックス番号の表示,初期時またはonChange時にindex番号を渡す
on: {
init: function () {
onChangeFunc(this.realIndex);
},
slideChange: function () {
onChangeFunc(this.realIndex);
},
},
});
// onchangeで動く関数
function onChangeFunc(index) {
// インデックス番号の表示,10以上になる場合の条件分岐している
if (index < 9) {
document.getElementById("swiperIndexDisplay").textContent = `0${index + 1}`;
} else {
document.getElementById("swiperIndexDisplay").textContent = `${index + 1}`;
}
}
const subCarousel = new Swiper(".childSwiper", {
loop: true,
slidesPerView: 5,
freeMode: true,
watchSlidesProgress: true,
spaceBetween: 16,
});上記では、カルーセル画像が変わるたび、すなわちonChangeしたときにonChangeFunc関数が動作するようにしています。
onChange時の挙動を追加する際は、parameterのonを使用し、initメソッドとslideChangeメソッドを使用します。initで初期状態時、onChange時にはslideChangeの関数が呼ばれるようになります。
またonChangeFuncの引数にはカルーセルのindex番号realIndexを渡しています。
あとはCSSを追加します。
// index番号のスタイル
#swiperIndexDisplay {
color: #fff;
font-size: 14px;
margin-bottom: 14px;
}投稿のタイトルと日付の表示
あとは非表示にしている投稿のタイトルと日付をJavaScriptで表示します。
HTML
<div class="c-gallery">
<div class="c-gallery__content">
<div class="c-gallery__left-section">
<div class="c-gallery__parent">
<div class="swiper parentSwiper">
<!-- カルーセルのプレビュー側 -->
<div class="swiper-wrapper">
<!-- 投稿画像の繰り返し処理 -->
<?php $index = 1; while ( have_posts() ) : the_post(); ?>
<div class="swiper-slide">
<div class="c-gallery__list">
<img src="<?php echo get_field("news-image"); ?>" alt="テスト画像" class="c-gallery__list-img">
</div>
<!-- Swiperの処理にわたすテキスト -->
<div class="c-gallery__text-area">
<div id="disabledDate<?php echo $index; ?>" class="c-gallery__date"><?php echo get_field("date"); ?></div>
<div id="disabledTitle<?php echo $index; ?>" class="c-gallery__title"><?php echo get_field("title"); ?></div>
</div>
</div>
<?php $index++; endwhile; ?>
</div>
</div>
<!-- 文字の表示 -->
<div class="c-gallery__detail">
<p id="displayDate" class="c-gallery__detail-day"></p>
<p id="displayTitle" class="c-gallery__detail-main"></p>
</div>
</div>
<!-- オリジナルページネーション -->
<div class="c-gallery__index">
<div class="c-gallery__line"></div>
<div id="swiperIndexDisplay"></div>
<div id="customDots"></div>
</div>
</div>
<!-- サムネのカルーセル -->
<div class="c-gallery__thm">
<div class="swiper childSwiper">
<div class="swiper-wrapper">
<!-- 投稿画像の繰り返し処理 -->
<?php while ( have_posts() ) : the_post(); ?>
<div class="swiper-slide --child">
<div class="c-gallery__child">
<img src="<?php echo get_field("news-image"); ?>" alt="サムネ画像" class="c-gallery__child-img">
</div>
</div>
<?php endwhile; ?>
</div>
</div>
</div>
</div>
</div>更にWhile文で繰り返し処理している投稿データのタイトルと日付に対して、一意でDOMの取得をできるようにするために、index番号を付与します。これで準備完了です。
ここからは先程作成したonChangeFunc関数に処理を追加します。
// onchangeで動く関数
function onChangeFunc(index) {
// インデックス番号の表示,10以上になる場合の条件分岐している
if (index < 9) {
document.getElementById("swiperIndexDisplay").textContent = `0${index + 1}`;
} else {
document.getElementById("swiperIndexDisplay").textContent = `${index + 1}`;
}
// loop内の投稿データの日付(id=disabledDate+index)から表示箇所(id=displayDate)へ代入
document.getElementById("displayDate").textContent = document.getElementById(
`disabledDate${index + 1}`
).textContent;
// loop内の投稿データのタイトル(id=disabledTitle+index)から表示箇所(id=displayTitle)へ代入
document.getElementById("displayTitle").textContent = document.getElementById(
`disabledTitle${index + 1}`
).textContent;
}
getElementByIdで一意となった日付とタイトルを取得してから表示したい箇所へ代入しています。
最後にCSSを追加します。
// 画像の補足文字のスタイリング
.c-gallery__detail {
color: #fff;
margin-top: 24px;
font-size: 14px;
display: flex;
height: 42px;
}
.c-gallery__detail-main {
margin-left: 24px;
}これですべて完了です。
最終的なコード
HTML
<div class="c-gallery">
<div class="c-gallery__content">
<div class="c-gallery__left-section">
<div class="c-gallery__parent">
<div class="swiper parentSwiper">
<!-- カルーセルのプレビュー側 -->
<div class="swiper-wrapper">
<!-- 投稿画像の繰り返し処理 -->
<?php $index = 1; while ( have_posts() ) : the_post(); ?>
<div class="swiper-slide">
<div class="c-gallery__list">
<img src="<?php echo get_field("news-image"); ?>" alt="テスト画像" class="c-gallery__list-img">
</div>
<!-- Swiperの処理にわたすテキスト -->
<div class="c-gallery__text-area">
<div id="disabledDate<?php echo $index; ?>" class="c-gallery__date"><?php echo get_field("date"); ?></div>
<div id="disabledTitle<?php echo $index; ?>" class="c-gallery__title"><?php echo get_field("title"); ?></div>
</div>
</div>
<?php $index++; endwhile; ?>
</div>
</div>
<!-- 文字の表示 -->
<div class="c-gallery__detail">
<p id="displayDate" class="c-gallery__detail-day"></p>
<p id="displayTitle" class="c-gallery__detail-main"></p>
</div>
</div>
<!-- オリジナルページネーション -->
<div class="c-gallery__index">
<div class="c-gallery__line"></div>
<div id="swiperIndexDisplay"></div>
<div id="customDots"></div>
</div>
</div>
<!-- サムネのカルーセル -->
<div class="c-gallery__thm">
<div class="swiper childSwiper">
<div class="swiper-wrapper">
<!-- 投稿画像の繰り返し処理 -->
<?php while ( have_posts() ) : the_post(); ?>
<div class="swiper-slide --child">
<div class="c-gallery__child">
<img src="<?php echo get_field("news-image"); ?>" alt="サムネ画像" class="c-gallery__child-img">
</div>
</div>
<?php endwhile; ?>
</div>
</div>
</div>
</div>
</div>CSS
.c-gallery {
padding: 80px 16px 100px 16px;
background-color: #333;
}
.c-gallery__content {
display: flex;
max-width: 1120px;
justify-content: space-evenly;
width: 100%;
margin-top: 68px;
margin: 68px auto 0;
flex-wrap: wrap;
}
.c-gallery__left-section {
display: flex;
}
.c-gallery__list {
max-width: 380px;
min-width: 380px;
max-height: 220px;
min-height: 220px;
opacity: 1 !important;
}
.u-opacity {
opacity: 1 !important;
}
.c-gallery__list-img {
max-width: 380px;
min-width: 380px;
max-height: 220px;
min-height: 220px;
object-fit: cover;
opacity: 1 !important;
}
.c-gallery__child {
max-width: 117px;
max-height: 100px;
min-height: 100px;
max-width: 117px;
}
.c-gallery__child-img {
object-fit: cover;
max-width: 117px;
max-height: 100px;
min-height: 100px;
max-width: 117px;
}
.c-gallery__thm {
width: 100%;
max-width: 640px;
position: relative;
margin-top: 100px;
}
.c-gallery__parent {
max-width: 380px;
position: relative;
}
.c-gallery__parent::before {
content: "";
max-width: 380px;
width: 100%;
height: 220px;
border: #fff solid 1px;
position: absolute;
top: 8px;
right: -8px;
}
.c-gallery__text {
top: 10px;
position: relative;
color: #fff;
z-index: 10;
}
.c-gallery__text-area {
display: none;
}
// オリジナルdots
.c-gallery__index {
display: flex;
flex-direction: column;
align-items: center;
margin-left: 24px;
}
.c-gallery__line {
width: 1px;
height: 56px;
background-color: #fff;
margin-bottom: 4px;
}
#customDots {
text-align: center;
display: flex;
flex-direction: column;
row-gap: 16px;
max-height: 180px;
flex-wrap: wrap;
}
#customDots .swiper-pagination-bullet {
display: inline-block;
width: 12px;
height: 12px;
background-color: #fff;
border-radius: 50%;
margin: 0 5px;
background-color: rgba($color: #fff, $alpha: 0.6);
}
#customDots .swiper-pagination-bullet-active {
background-color: rgba($color: #fff);
position: relative;
}
#customDots .swiper-pagination-bullet-active::after {
position: absolute;
content: "";
width: 24px;
height: 24px;
background-color: rgba($color: #fff, $alpha: 0.6);
border-radius: 100vh;
top: -50%;
left: -50%;
}
// index番号のスタイル
#swiperIndexDisplay {
color: #fff;
font-size: 14px;
margin-bottom: 14px;
}
// 画像の補足文字のスタイリング
.c-gallery__detail {
color: #fff;
margin-top: 24px;
font-size: 14px;
display: flex;
height: 42px;
}
.c-gallery__detail-main {
margin-left: 24px;
}
/* すべてのスライドの基本スタイル */
.swiper-slide.--child {
  opacity: 0.5; /* 非アクティブなスライドは薄く表示 */
  transition: opacity 0.3s;
}

/* アクティブなスライドのスタイル */
.swiper-slide.--child.swiper-slide-thumb-active {
  opacity: 1; /* アクティブなスライドは通常の不透明度 */
}
JavaScript
const mainCarousel = new Swiper(".parentSwiper", {
loop: true,
spaceBetween: 10,
thumbs: {
swiper: subCarousel,
},
autoplay: {
delay: 3500,
disableOnInteraction: false,
},
effect: "fade",
// ページネーションのカスタム
pagination: {
el: "#customDots",
clickable: true,
renderBullet: function (index, className) {
return '<span class="' + className + '"></span>';
},
},
// インデックス番号の表示,初期時またはonChange時にindex番号を渡す
on: {
init: function () {
onChangeFunc(this.realIndex);
},
slideChange: function () {
onChangeFunc(this.realIndex);
},
},
});
// onchangeで動く関数
function onChangeFunc(index) {
  // インデックス番号の表示,10以上になる場合の条件分岐している
  if (index < 9) {
    document.getElementById("swiperIndexDisplay").textContent = `0${index + 1}`;
  } else {
    document.getElementById("swiperIndexDisplay").textContent = `${index + 1}`;
  }

 // loop内の投稿データの日付(id=disabledDate+index)から表示箇所(id=displayDate)へ代入
  document.getElementById("displayDate").textContent = document.getElementById(
    `disabledDate${index + 1}`
  ).textContent;

  // loop内の投稿データのタイトル(id=disabledTitle+index)から表示箇所(id=displayTitle)へ代入
  document.getElementById("displayTitle").textContent = document.getElementById(
    `disabledTitle${index + 1}`
  ).textContent;
}
const subCarousel = new Swiper(".childSwiper", {
loop: true,
slidesPerView: 5,
freeMode: true,
watchSlidesProgress: true,
spaceBetween: 16,
});最終的なコード
いかがだったでしょうか、Swiperは様々なParameterやMethodが用意されているので柔軟に実装できるかなと思います。
また、オリジナルのページネーションを作れるようになると見栄えも上がり差別化を図れそうです。
Swiperを使いこなしてオリジナルのカルーセルを作ってみてください!